Monday, October 29, 2012

Carmel Apple Crisp

 
Are you one those "fall" people? You know...the ones who can't stop talking about how much they love fall and all things fall. As early as June their complaining about the heat and dreaming about over-sized sweatshirts, the pumpkin patch and apple cider. Don't get me wrong, I LOVE wearing my boots and flannel shirts, going to football games, all things pumpkin and seeing the pretty trees turn gorgeous shades of gold, auburn and chestnut. But I personally LOVE summer! I'm not a fan of being cold or having my patio furniture blow 2 houses down in the awful winds that Nebraska endures. Oh how I miss the Farmer's Market and Pool. My kids and I were made to play outside, it's in our blood! But fall is more of a "stay inside where it's nice and cozy" time. And it's a reminder of another fate. Nebraska Winters. Not Good! Ok, I'll stop whining and get to the point. When fall brings you apples...make apple crisp! Embrace the change! And let me tell you, this recipe helped me get over my pity party quick! THE MOST AMAZING CARAMEL APPLE CRISP EVER! 
 

CARAMEL APPLE CRISP
Apple Filling:
5 large Granny Smith apples - peeled, cored, and thinly sliced
1/2 cup white sugar
1 tablespoon all-purpose flour
2 tsp cinnamon
1/2 tsp pumpkin pie spice
2 Tbl lemon juice
1/2 c caramel topping

Crumble Topping:
1 1/2 cups all-purpose flour
1 cup brown sugar
1 cup quick cooking oats
1 cup butter, softened

Preheat oven to 350. In a medium size bowl, toss apples with sugar, flour, cinnamon, and lemon juice. Pour and spread evenly into a 9x13 inch pan. Pour caramel topping over the apples. In another bowl, mix together flour, brown sugar, oats, and butter; spoon mixture evenly over apples.
Bake for about 45 minutes (apple mixture will bubble and topping will be golden brown).
 
Top with Ice Cream, taste and enjoy!
 
 
Warmly, 
Mary

Wednesday, September 19, 2012

Healthy Chocolate Chip Banana Muffins


My little warrior is in school now. Everyday. All day. I'm not quite sure how I feel about it. I don't really give myself an opportunity to think about it. I miss him. He loves it. The day before school started I got anxiety...big time! Yes, about him growing up and all that, but we'll chat about that on another day. But I also started to dread schedules and a lack of freedom. The kids and I are on the go all the time. And we (I mean me) can come up with an excuse to head out of town at the drop of a hat. No more last minute trips to Kansas City or a day at the zoo. Boo to loss of freedom. But he loves kindergarten and I guess that's part of our culture, so I had to get over myself and look for the positives. Like coffee once a week with my gal pals!

I had never been a huge fan of healthy pastries, but then my friend Julie made some super yummy morning glory muffins and I decided that healthy was actually great. They were tasty and I didn't have to feel guilty about eating it! So, I decided to come up with my own healthy muffin recipe...it was a hit! My little warrior boy had 4 in one sitting! Winner!


HEALTHY CHOCOLATE CHIP BANANA MUFFINS


2 cups whole-wheat flour
3 ripe bananas, mashed
2 eggs, beaten
½ cup semi-sweet chocolate chips
1/3 cup oil
¼ cup plain yogurt
¼ cup honey
1 tsp vanilla
1 tsp cinnamon
¾ tsp baking soda

Preheat oven to 350 degrees and spray or line muffin tine. Mix together the flour, cinnamon, baking soda, and a pinch of salt. In another bowl mix mashed bananas, yogurt, honey, eggs, oil, and vanilla. Fold the banana mixture into the flour mixture until blended but do not over-mix. Now fold in the chocolate chips.
Divide evenly into prepared muffin tin and bake for about 15 – 20 mins.

Next time I will also add tasty walnuts, either in the muffin or sprinkled on top. Enjoy! 


Friday, July 6, 2012

S'MORES ON A STICK


Hi Friends! So here's the story on these sweet, salty and crunchy treats! It was the morning of this year's Independence Day, we had a full day of celebration planned beginning with fresh donuts from the bakery, decorating bicycles with red white and blue streamers followed by a neighborhood bike parade! And of course I decided in the middle of it all, that we needed one more dessert for our BBQ.


No time for something BIG because, that afternoon naps would be a MUST for my Warrior and Princess since we had committed to an outrageous Water Balloon Fight, then neighbors were coming over for the cookout before the fabulous Firework displays! Yes, display"S", the fireworks in our area are nuts! 

Anyway, I had already made the flag Strawberry Pretzel dessert, something fruity and refreshing but I needed chocolate too...just in case! And something simple and no baking! And maybe something that resembled fire roasted s'mores! S'mores speak summer to me (doesn't your food speak to you?).


S'mores on a stick! And they were oh so delish! They were a hit! I added peanut butter to the marshmallow chocolate and graham cracker trio to hold the marshmallow in place while dipping. And what a fabulous idea! It tastes like a cross between a Reese's and Kit Kat! MmmmHmmm! I'm so thankful for my freedom! Aren't you? Have Birthday America!


S'MORES ON A STICK

WHAT YOU'RE GONNA NEED
lollipop sticks
Graham Crackers
Marshmallows (I used the cool flat ones, Kraft Jet-Puffed StackerMallows)
Dipping chocolate (I used Cocoa Candy Melts)
Peanut Butter


WHAT YOU'RE GONNA DO
Line a cookie sheet with parchment paper.
Break graham crackers into individual rectangles.
Smear PB on two crackers.
Place a marshmallow between the two crackers.
Dip a lollipop stick in the chocolate about an inch deep and push through the marshmallow.
Continue to make as many as your heart pleases and allow the chocolate to harden to that it won't all fall apart when you dip it.
Now dip the stable "pop" in the chocolate, allowing access chocolate to drip off.
Set on the parchment paper and allow to harden.


Celebrate! Share! Enjoy!

Warmly, 
Mary

Wednesday, May 23, 2012

Chocolate Chip Caramel Pecan Rolls


Wow, a year of blogging and my 100th recipe! Where has the year gone? Well, it would be way too long a post to list all of the adventures, triumphs, challenges and milestones that I've seen this year. But some highlights of just this month are that the Warrior graduated from preschool today and is headed off to Kindergarten in the fall! I am so proud of him! I absolutely loved watching the Warrior play soccer and they just finished the season undefeated...just in time to begin his busy schedule with t-ball!
The absolute BEST preschool teachers!

Taking it in for the goal!

The Princess just completed her first year of preschool  and is still trying to figure out what activities she would like to enjoy this summer, besides just being cute and playing with her friends! She is an absolute joy to be around and has quite the imagination for creative play!


Singing "Jesus Loves Me!" at her Preschool Program

Posing like a princess

Mothers Day and My Birthday were in the same week ( I love May!), which gave me plenty excuses to be spoiled last week! How great is that? So, I made us some 
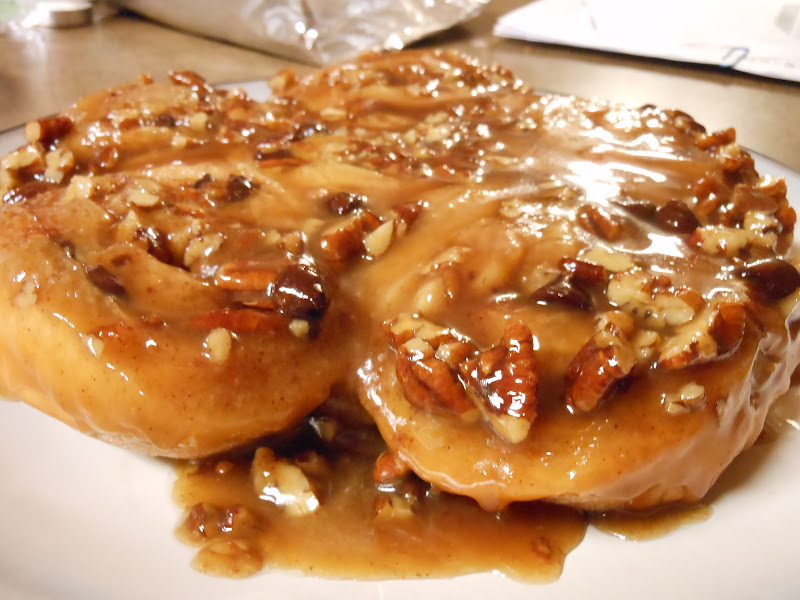
fabulous Chocolate Chip Carmel Pecan Rolls! I definitely limited my splurges, after all we have a big wedding coming up, my big brother is getting married! But I needed these rolls on my birthday week!

Ooey gooey caramel topping, crunchy pecans and rich chocolate pieces!  Yum! You gotta make these rolls, there's plenty to celebrate here!


CHOCOLATE CHIP CARAMEL PECAN ROLLS
One large 9x13 pan or 3 small round pans of rolls

Dough:
4 1/2 cups flour
1 cup  milk
5 Tbl butter
2 large eggs, room temperature
1/2 cup sugar
1 envelope rapid-rise yeast
1  tsp salt

Filling Ingredients:
1  cups packed light brown sugar
5 Tbl unsalted butter, room temp
2 Tbl cinnamon
1/2 cup chocolate chips, I used semi-sweet
1/2 cup chopped pecans

Caramel Topping:
1 1/2 cup brown sugar
12 Tbl butter
1/2 cup pecans, chopped
1/3 cup heavy cream
1/3 cup honey
1/3 cup water
1 tsp vanilla
1/2 tsp sea salt

Ok, let's get started! We'll begin with the Dough. In a medium saucepan over medium heat, warm the butter...just until it begins to get steamy. Don't let it boil! Remove from the heat and stir in the sugar and the butter. Let the butter melt and the milk cool down a bit...oh say...10 minutes. Now add the yeast. Mix in it well and let it hang out for a minute while you get your stand mixer. I hope you have one...it will make these rolls so much easier! If you don't...that's ok, you can do it by hand!
Ok, so in the large mixing bowl add 2 1/2 cups of the flour and salt. Now, add your milk mixture and whisk with the whisk attachment until is looks good and mixed. Add the eggs and mix well. Now switch out the whisk attachment and put in the dough hook. Add the remaining flour and let your mixer go to town for about 5 minutes. If you don't have the mixer, this is when your get to do it all by hand! Now cover the dough with a clean dish towel and place in a warm spot for at least an hour, so that it can rise.

In the meantime...let's make Caramel Topping! In a small saucepan over medium heat add the butter and the brown sugar. Stir until the butter is melted and the sugar in well incorporated. Remove from the heat and stir in the cream, honey, water, vanilla and sea salt.

Heat the oven to 325.  I like to use 3-8" round cake pans...and either freeze or give away the 2 extra pan of rolls. Lord knows we don't need 2 dozen cinnamon rolls in my house! Anyway, pour and/or divide the caramel topping unto the pan(s). Sprinkle with pecans.

When the dough has doubled in size place it on a clean and nicely floured working surface and roll it out in a large rectangle. I'm not great with measurements (I knew I should have gotten the yard stick out) but you want it about a 1/4" thick...so about 24" inches long and I dunno, about 8-10" wide. Spread on the butter, sprinkle with the brown sugar, sprinkle with the cinnamon, sprinkle on the chocolate chips and pecans. Then with the side furthest from you being to roll it up...fairly tight. Now cut slices a little thicker than 1"slices. I usually get 18 good sized rolls. Set them on the caramel goodness in the pans. Cover and set in a warm place once again but just for 20 minutes this time.

Bake for 30-35 minutes or until golden brown. Set a plate on top of the finished rolls and flip over letting the caramelly goodness drip down the sides.


Enjoy my friends!

Warmly,
Mary

Saturday, March 17, 2012

St. Patrick's Day Snack


I love how growing up my mom would go all out celebrating St. Patrick's Day with the family. My dad's side of the family is Scott-Irish and my momma made celebrating that heritage really fun for us kids. Here's a fun and tasty snack everyone! You don't have to be a kid to eat these...you don't even need to be Irish! Just Enjoy!


POT 'O GOLD AT THE END OF THE RAINBOW

4 cups Rice Chex Cereal
4 cups Pretzels
 10.5-ounce bag of Fritos
1 1/2 cup light brown sugar, packed
3/4 cup butter
3/4 cup light corn syrup
1 tsp vanilla
1 cup of green M&Ms (I used regular and pretzel M&M's)
bag of caramel corn (optional) I used Vic's or of course you could add regular popcorn
Shamrock Bites (optional)
 
Heat oven to 350°F.
In a small saucepan over medium heat combine butter, brown sugar and corn syrup. Melt the butter and let the mixture come to a boil. Continue to let it boil for 4 minutes and don’t stir it…to keep you from stirring it, combine the Chex, Fritos, and Pretzels in a large roasting pan.
Pour the caramel topping over chip mixture, stir to coat evenly. Bake for 10 minutes. Stir then bake for an additional 5 minutes. Pour onto parchment paper and allow cooling. Break into snack pieces. Now stir in the caramel corn and the M&M’s and these cute little Shamrock bites!


See…The Pot O Gold at the end of the Rainbow! Enjoy!

Warmly,
Mary

Shamrock Bites


 These super fun shamrock bites are the perfect little snack for St. Patricks Day! You can eat them on their own or use them as a cupcake topper. In our home, we love that sweet and savory combination...perfect for snacking!
When I was growing up, my momma made St. Patrick's Day so fun! We all wore green and she made all the food for our meals and snacks green, she taught us about St. Patrick and Ireland...I love it! We ate everything from green mashed potatoes, green jello, green salad, we even had green pizza! Everything she could think of to turn green, she did! And we loved it! Sure it wasn't authentic but we had a blast and it stuck with us! Each of my bothers and I have a fond Proudness of our Irish heritage! Thanks mom!
SHAMROCK BITES

Pretzel twists
Candy melts (white or green)
Green M&M's

Heat oven to 250. Line a cookie sheet with parchment paper. Spread pretzels on the cookie sheet. Set one candy melt disk on each pretzel. Set in the oven for 3 - 5 minutes. Place 3 M&M's on each pretzel, resembling the Shamrock!
 Allow to cool then snack away!
Erin Go Braugh!


Warmly,
Mary

Monday, March 12, 2012

Beef Enchiladas with Red Sauce


Hola Amigos! You all know how I love Mexican food. Well, I don't know how authentic these are, but they sure are yummy and they definitely quench my craving for a warm Mexican dish! My sweet sweet Superman is sending me away to one of my favorite states for a little R&R. Just me! I know, can you believe it? I can not wait! Anyway, when I'm down in the Southwest I promise to do my "research" for the most authentic Mexican food recipes! And by research I do mean EAT! Until then, try my Midwest version of Beef Enchiladas! And you know what? My Midwest versions of Mexican Food must not be too bad, because my Midwest Carnitas and Tamales get the most views on my blog! They are a hit! Enjoy my Friends!

By the way...don't miss at the end of this post...it's my favorite!


BEEF ENCHILADAS
10 - 12 depends on how full you stuff 'em!

1lb ground beef
½ cup onion, diced
Red sauce (recipe below) Or one large can of store bought
3 cups cheddar cheese shredded (set 1 cup of cheese aside for the topping at the end)
1 pkg flour tortillas (we use whole grain)
shredded lettuce, avocado, red onion, diced tomato, sour cream, jalapeños (optional toppings)

Heat oven to 350. Spray a 9x13-inch baking dish nonstick spray.
In a large skillet brown the meat over medium heat. When the meat is about half way cooked add onion and continue to cook until the meat is done. Drain any grease if necessary. Add ½ cup of the red sauce to meat. Add another ½ cup to the bottom the baking dish.
Now lets put together the enchiladas! Place a tortilla on your work surface. Spoon a heaping spoonful (about ¼ cup) of meat in the center of the tortilla. Add a small handful (or a large pinch) of cheese on top of the meat. Roll the tortilla tightly and place it seam side down in the pan. Repeat until all the meat is gone. Pour the remaining sauce over the enchiladas. Cover with foil and bake for 30 minutes.
Remove the foil and add the cup of cheese that you set aside earlier. Bake for another 5 – 7 minutes. Until cheese is just melted!
Add your favorite toppings and ENJOY! 
For the Red Sauce
2 Tbl oil
2 Tbl flour
2 Tbl chili powder
1 tsp garlic powder
1 tsp ground cumin
1 tsp onion salt
2 cups chicken broth
1 6oz can tomato paste

In a large skillet heat oil over medium heat for just a minute. Whisk in flour and all seasonings. Cook and whisk until lightly browned. Whisk in tomato paste. Now slowly whisk in chicken broth. Reduce heat to medium-low and stir until smooth. Simmer for about 20 minutes. Or of course you can use the store bought stuff! 


Warmly, 
Mary

Friday, March 9, 2012

Almond Pound Cake with Strawberry Compote


Ah, what a gorgeous day outside today! Spring is just around the corner and I am enjoying every minute that I can outside! Today the Warrior and the Princess and I went on a wonderful bike ride and tons of playing in the sun! I even enjoyed a short 2 mile run! With all that exercise, I needed to find something to bake! It only makes sense, right? Well, in my mind it does. Especially since spring makes me think of going to the strawberry patch and the strawberry patch makes me think of strawberries (duh!) and strawberries make me think of almond pound cake with vanilla bean ice cream and strawberry compote! Mmmm...mmm...good! The strawberries have been so good lately we are on our 4th carton and I have 3 extras in the fridge because we are going through them so much!
Your going to love this not-too-sweet moist cake with gentle almond and vanilla flavors. We did!


ALMOND POUND CAKE

½ cup butter, room temp
1 cup sugar
2 tsp almond extract
2 tsp vanilla
3 eggs
½ cup sour cream
1 ½ cups flour
1 tsp baking powder
¼ tsp baking soda

Heat oven to 325. Grease loaf pan. Sift together flour, salt, baking powder and baking soda and set aside.
In a large mixing bowl cream butter, sugar, almond extract and vanilla with a mixer on medium speed for about 3 minutes. Add eggs, one at a time, beating and scraping the bowl with rubber spatula between each add in. Mix in ½ the flour mixture and ½ the sour cream and combine on low speed. Add remaining flour and sour cream and mix until well combined. Pour into the prepared pan. Bake 50-60 minutes, or until a toothpick inserted in the middle comes out clean.
 Cool cake in pan for 20 minutes then turn out onto a wire rack to finishing cooling or serve warm!

We didn't have vanilla bean ice cream on hand this time, so we settled for cool whip. But I think that my customers were still happy!

STRAWBERRY COMPOTE

2 cups strawberries, washed, hulled and cut into quarters
2 Tbl sugar

Over medium-low heat, in a sauce pan combine the strawberries and sugar. Stir and let them simmer for about 10 - 15 minutes or until then begin to break down to the consistency that you like. 
I love to serve mine warm over ice cream! The family loves cool whip too!

Enjoy! 

Warmly, 
Mary

Wednesday, February 8, 2012

Pizza Bites

Party Food OR Simple Supper

Today my little princess told me that when I grown up I can be a doctor and own a cupcake store. She will be my girl doctor. The warrior boy will be the football player. Daddy aka Superman will make money on the computer. Our 16 year old will make cupcakes at my cupcake store and the 18 year old will go to college! I like her plan! Sounds pretty much perfect to me...except depending on how long it takes me to grow up...I'm hoping that the 18 year old won't still be in college!

So I'm pretty sure you're going to enjoy these Pizza bites! Pretty much anytime you stuff cheese inside crescents, it's going to be a crowd pleaser! And anyone can make these! My little princess made several of them and they probably were better than mine. Especially considering that she added two fists full of pepperoni's in each roll! She's awesome!


PIZZA BITES
(these are the amounts that I used...adjust amounts accordingly)

4 pkg refrigerated crescent rolls
2 pkg pepperoni
1 lb mozzarella cheese block, cut in cubes
garlic powder
Italian seasoning
1 jar marinara for dipping

Heat oven to 350. Unroll crescents and separate at perforations. In the center of each triangle place several pepperoni slices and a chunk of cheese. Bring each corner over the top and pinch to seal. When all the rolls are made, sprinkle with garlic powder and Italian seasoning. Bake for 15 - 20 minutes or until golden brown. Serve with heated marinara sauce.

Enjoy!


Warmly,
Mary

Tuesday, February 7, 2012

Italian Nachos


Did you enjoy the Super Bowl game as much as I did? Ok, I'll be completely honest with you. As much as I like watching football, I only watched about 10% of the game. The rest of the time I chatted it up with my house full of friends and ate way too much good food!

I didn't make these fantastic Italian Nachos for the game...the kids had them for lunch before the game! But they are a perfect game day food!

I know...I know...our beloved Huskers are a college team...but my kids don't own NFL gear! Check out our game day excitement! 


Talk about TEAM Spirit! Wasn't that fun! Ha, ha! Ok, now on with the food! You won't regret making this...I set it on the table while I was whipping up all the Super Bowl Party food and hollered "Lunch is ready!" Minutes later I came back to an empty pan and satisfied smiles!


ITALIAN NACHOS

1/2 bag more or less Tortilla Chips
1/2 lb more or less Italian Sausage, browned in a skillet
1 pkg pepperoni, I used the cute little mini ones
1 bag more or less Italian Blend Shredded Cheese
pepperoncini peppers, sliced
marinara sauce for dipping (optional)

Heat oven to 400. Layer tortilla chips on a baking sheet. Sprinkle with large amounts of cooked meat and cheese. Bake for 5 - 10 minutes, until the cheese is melted. Sprinkle with peppers.


Share, serve and enjoy!

Warmly,
Mary

Tuesday, January 24, 2012

Chocolate and Butterscotch Blondies with Creamy Maple Sauce

I'm a little bit excited to share this recipe with you...ok, a lot bit excited! We had some fabulous friends over for dinner Saturday night and I "invented" this recipe for them. Then we made them again today. In my opinion they were JUST AS GOOD the second time around! If you're more of a brownies person than blondies person...I did double the chocolate chip amount compared to the amount I originally added...so there's your chocolate. And I kid you not...there were moans of yummy goodness when I served these! I don't know if it was the blondies that received the moans or the luscious sauce....do NOT skip the sauce!


CHOCOLATE AND BUTTERSCOTCH BLONDIES WITH CREAMY MAPLE SAUCE

BLONDIES
1/3 cup butter
1 1/2 cups brown sugar
1 1/2 cups flour
2 eggs
1 tsp baking powder
1 1/2 tsp vanilla
1 cup semisweet chocolate chips
1/2 cup butterscotch chips
1/2 cup walnuts, chopped

Heat oven to 350. Brown butter in sauce pan -- if you're new to this, basically melt the butter over medium heat then continue to cook for 5 - 7 minutes. Keep an eye on it and remove it as soon as it gets golden brown. Allow to cool. Butter an 8X8 pan.
In a medium mixing bowl combine butter, sugar, and vanilla. Beat in eggs until everything is smooth. Stir in baking powder and flour until just mixed. Now for the chips and nuts...mix until well combined.
Spread into the pan and bake 25 minutes. It can be slightly under-cooked. Because let's be honest, it's better that way!


CREAMY MAPLE SAUCE
1/2 cup butter
1/2 cup cream cheese
2/3 cup powdered sugar
3 Tbl Real maple syrup

Cream all the ingredients in a mixing bowl until light and creamy. Microwave for 1 1/2 - 2 minutes and pour over blondies or pretty much anything...you'll be glad you did!

ENJOY!

Warmly,
Mary