Wednesday, September 24, 2014

Making Butterschotch Chocolate Chip Cookies with a Princess


Yesterday I picked the princess up from school and she had a bright green sticker on her shirt that read, "noon dismissal tomorrow". That's been happening a lot lately, so how had I missed that? But it was like a perfectly wrapped gift secretly placed on my door step!

After the batting cages and a fantastic movie called "When The Game Stands Tall" football movie with the warrior boy, it was time for me and my sweet curly haired princess to hang out for some girl time! We had a tea party, made cookies, ate too much cookie dough, and she read "Fancy Nancy" books to me! My heart was FULL.


So, are you ready for these cookies? I do love a good chocolate chip cookie, but these just kicked it up a notch, It cuts the bites rich chocolate with bursts of butterscotch and is just down right good! The cookies are soft and chewy but crunchy around the edges. Oh ya...they are packed with chippy goodness. Seriously perfect! Ok, so just try them for yourself. And I hope that you can find a cute little helper to enjoy them with!


Ok, let's get on with it.


Butterscotch Chocolate Chip Cookies
1 cup butter, softened
3/4 cup packed brown sugar
2 eggs
1 tsp vanilla
2 1/2 cups all-purpose flour
1 tsp baking soda
1 small package vanilla pudding
1 bag semi-sweet chocolate chips
1 cup butterscotch chips

Heat oven to 350. Cream butter, sugars, eggs and vanilla on medium speed until light and fluffy. Mix in flour, baking soda and pudding mix. Stir in the butterscotch and chocolate chips. Drop teaspoonfuls (I use a cookie scoop) onto ungreased cookie sheet.  Bake 10 minutes or until golden brown.

Now quick grab one, blow on it for a couple seconds and take a bite! Good huh? Now have another one or two. (Unless you filled up on too much cookie dough). Enjoy!

Monday, June 10, 2013

Birthday Waffles


Life is a miracle. Life is precious. Life is important. Life is to be celebrated. And that is exactly what we do! In our home, we LOVE birthdays! And we celebrate birthdays...BIG! In fact we take a whole week to celebrate the occasion!

One of the ways we celebrate is with breakfast in bed. We have done this since the kids were tiny. It makes the kids feel special and they love it!

So today we celebrate my little Princess. A wonderful year of memories, growing, preschool graduation, riding a bike without training wheels, learning to tie shoes, kindness, goodness, gentleness, cuddles, kisses, silliness, vacations, gymnastics, learning to ski on her own, learning to swim, writing words and sounding them out too. We celebrate a little girl learning about Jesus and loving God and how to treat others. We celebrate an amazing young lady.

Here's how we did breakfast in bed for a special little girl!


BIRTHDAY WAFFLES
2 cups flour
1/2 cup sugar
1 tablespoon baking powder
1 3/4 cups milk
2 large eggs,
3/4 cup butter, melted and cooled
1 teaspoon vanilla extract
2 tablespoons rainbow sprinkles, plus some for topping
Whipped Cream


Combine the flour, sugar, and baking powder in a mixing bowl. In another bowl, beat the milk, eggs,  melted butter and vanilla. Pour the milk mixture over the dry mixture and mix until just combined. Stir in sprinkles. Heat your waffle iron and let the batter sit for a few minutes and get fluffy!

When the iron is ready, measure and pour batter and cook according to the waffle iron instructions.

Top hot waffle with butter, maple syrup, whipped cream and rainbow sprinkles!


Blow out a candle, Make a wish, and Enjoy!


Thursday, May 9, 2013

Magic Bars


I had to make these Magic Bars! When we visited Walt Disney World a few months ago, Superman got back from the resort bakery very excited! "These are the best bars I've ever had!".  I took one look and knew, Magic Bars! The crunchy coconut, milky butterscotch chips and creamy chocolate chips were the dead giveaway. And upon closer review, biting into the buttery graham cracker crust, my suspicions were confirmed! They are pretty darn rich...and tasty. I decided I would wait until the perfect occasion to impress my darling with my culinary expertise, and bake him a batch! Little does he know, that it's about as easy, as desserts get!


Oh, Disney World! It's no wonder they have "Magic" Kingdom and the "Magic" theme continues throughout the parks. And it's no wonder that these bars are labeled "Magic" Bars!  While we were at WDW, I ran my first half-marathon! It was definitely a magical experience! It was also then, that my Superman began training for his first half-marathon. Even more magical than running it myself, was watching my amazing husband compete on a nearly professional level! Finishing in 1 hr 23 mins and ranking 35th out of 6,825 runners, creating quite the impressive inaugural half-marathon finish! I was pretty proud of myself too, I finished 11,293th out of 22,739, in the top half of finishers! My goal was to not stop, and I didn't other than a restroom break at mile 5...which by the way, was just outside of the castle in Magic Kingdom!


With a weekend filled with busy race activities and an impressive performance by my husband, Magic Bars only seemed like the most appropriate post-race weekend treat! Plus, it was a great gathering the family around for a treat and talk about all of our wonderful WDW memories.


I hope you can find a "magical" reason to make these delicious bars too! And if you don't, then just making them is reason enough to celebrate!


MAGIC BARS
1/2 cup butter
1 pkg graham crackers (9), crushed (1 1/2 cups)
1 (14 ounce can) Sweetened Condensed Milk
1 cup sliced almonds, or any chopped  nut
1 cup semisweet chocolate chips
1 cup flaked coconut (I use unsweetened)
1 cup Butterscotch chips

Preheat oven to 350. Place butter in a 13x9 baking pan and place in the oven. As soon as all the butter is melted, remove from oven and evenly pour crumbs over melted butter. Drizzle sweetened condensed milk over graham cracker crumbs. Evenly layer remaining ingredients, in listed order. Press down firmly.
Now lets bake it for 25 minutes or until lightly browned. If you can wait, allow to cool. Not that I would scoop out a corner and shovel the piping hot goo in my mouth....

Cut into bars and enjoy!!

Monday, October 29, 2012

Carmel Apple Crisp

 
Are you one those "fall" people? You know...the ones who can't stop talking about how much they love fall and all things fall. As early as June their complaining about the heat and dreaming about over-sized sweatshirts, the pumpkin patch and apple cider. Don't get me wrong, I LOVE wearing my boots and flannel shirts, going to football games, all things pumpkin and seeing the pretty trees turn gorgeous shades of gold, auburn and chestnut. But I personally LOVE summer! I'm not a fan of being cold or having my patio furniture blow 2 houses down in the awful winds that Nebraska endures. Oh how I miss the Farmer's Market and Pool. My kids and I were made to play outside, it's in our blood! But fall is more of a "stay inside where it's nice and cozy" time. And it's a reminder of another fate. Nebraska Winters. Not Good! Ok, I'll stop whining and get to the point. When fall brings you apples...make apple crisp! Embrace the change! And let me tell you, this recipe helped me get over my pity party quick! THE MOST AMAZING CARAMEL APPLE CRISP EVER! 
 

CARAMEL APPLE CRISP
Apple Filling:
5 large Granny Smith apples - peeled, cored, and thinly sliced
1/2 cup white sugar
1 tablespoon all-purpose flour
2 tsp cinnamon
1/2 tsp pumpkin pie spice
2 Tbl lemon juice
1/2 c caramel topping

Crumble Topping:
1 1/2 cups all-purpose flour
1 cup brown sugar
1 cup quick cooking oats
1 cup butter, softened

Preheat oven to 350. In a medium size bowl, toss apples with sugar, flour, cinnamon, and lemon juice. Pour and spread evenly into a 9x13 inch pan. Pour caramel topping over the apples. In another bowl, mix together flour, brown sugar, oats, and butter; spoon mixture evenly over apples.
Bake for about 45 minutes (apple mixture will bubble and topping will be golden brown).
 
Top with Ice Cream, taste and enjoy!
 
 
Warmly, 
Mary

Wednesday, September 19, 2012

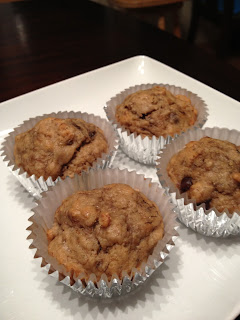
Healthy Chocolate Chip Banana Muffins


My little warrior is in school now. Everyday. All day. I'm not quite sure how I feel about it. I don't really give myself an opportunity to think about it. I miss him. He loves it. The day before school started I got anxiety...big time! Yes, about him growing up and all that, but we'll chat about that on another day. But I also started to dread schedules and a lack of freedom. The kids and I are on the go all the time. And we (I mean me) can come up with an excuse to head out of town at the drop of a hat. No more last minute trips to Kansas City or a day at the zoo. Boo to loss of freedom. But he loves kindergarten and I guess that's part of our culture, so I had to get over myself and look for the positives. Like coffee once a week with my gal pals!

I had never been a huge fan of healthy pastries, but then my friend Julie made some super yummy morning glory muffins and I decided that healthy was actually great. They were tasty and I didn't have to feel guilty about eating it! So, I decided to come up with my own healthy muffin recipe...it was a hit! My little warrior boy had 4 in one sitting! Winner!


HEALTHY CHOCOLATE CHIP BANANA MUFFINS


2 cups whole-wheat flour
3 ripe bananas, mashed
2 eggs, beaten
½ cup semi-sweet chocolate chips
1/3 cup oil
¼ cup plain yogurt
¼ cup honey
1 tsp vanilla
1 tsp cinnamon
¾ tsp baking soda

Preheat oven to 350 degrees and spray or line muffin tine. Mix together the flour, cinnamon, baking soda, and a pinch of salt. In another bowl mix mashed bananas, yogurt, honey, eggs, oil, and vanilla. Fold the banana mixture into the flour mixture until blended but do not over-mix. Now fold in the chocolate chips.
Divide evenly into prepared muffin tin and bake for about 15 – 20 mins.

Next time I will also add tasty walnuts, either in the muffin or sprinkled on top. Enjoy! 


Friday, July 6, 2012

S'MORES ON A STICK


Hi Friends! So here's the story on these sweet, salty and crunchy treats! It was the morning of this year's Independence Day, we had a full day of celebration planned beginning with fresh donuts from the bakery, decorating bicycles with red white and blue streamers followed by a neighborhood bike parade! And of course I decided in the middle of it all, that we needed one more dessert for our BBQ.


No time for something BIG because, that afternoon naps would be a MUST for my Warrior and Princess since we had committed to an outrageous Water Balloon Fight, then neighbors were coming over for the cookout before the fabulous Firework displays! Yes, display"S", the fireworks in our area are nuts! 

Anyway, I had already made the flag Strawberry Pretzel dessert, something fruity and refreshing but I needed chocolate too...just in case! And something simple and no baking! And maybe something that resembled fire roasted s'mores! S'mores speak summer to me (doesn't your food speak to you?).


S'mores on a stick! And they were oh so delish! They were a hit! I added peanut butter to the marshmallow chocolate and graham cracker trio to hold the marshmallow in place while dipping. And what a fabulous idea! It tastes like a cross between a Reese's and Kit Kat! MmmmHmmm! I'm so thankful for my freedom! Aren't you? Have Birthday America!


S'MORES ON A STICK

WHAT YOU'RE GONNA NEED
lollipop sticks
Graham Crackers
Marshmallows (I used the cool flat ones, Kraft Jet-Puffed StackerMallows)
Dipping chocolate (I used Cocoa Candy Melts)
Peanut Butter


WHAT YOU'RE GONNA DO
Line a cookie sheet with parchment paper.
Break graham crackers into individual rectangles.
Smear PB on two crackers.
Place a marshmallow between the two crackers.
Dip a lollipop stick in the chocolate about an inch deep and push through the marshmallow.
Continue to make as many as your heart pleases and allow the chocolate to harden to that it won't all fall apart when you dip it.
Now dip the stable "pop" in the chocolate, allowing access chocolate to drip off.
Set on the parchment paper and allow to harden.


Celebrate! Share! Enjoy!

Warmly, 
Mary

Wednesday, May 23, 2012

Chocolate Chip Caramel Pecan Rolls


Wow, a year of blogging and my 100th recipe! Where has the year gone? Well, it would be way too long a post to list all of the adventures, triumphs, challenges and milestones that I've seen this year. But some highlights of just this month are that the Warrior graduated from preschool today and is headed off to Kindergarten in the fall! I am so proud of him! I absolutely loved watching the Warrior play soccer and they just finished the season undefeated...just in time to begin his busy schedule with t-ball!
The absolute BEST preschool teachers!

Taking it in for the goal!

The Princess just completed her first year of preschool  and is still trying to figure out what activities she would like to enjoy this summer, besides just being cute and playing with her friends! She is an absolute joy to be around and has quite the imagination for creative play!


Singing "Jesus Loves Me!" at her Preschool Program

Posing like a princess

Mothers Day and My Birthday were in the same week ( I love May!), which gave me plenty excuses to be spoiled last week! How great is that? So, I made us some fabulous Chocolate Chip Carmel Pecan Rolls! I definitely limited my splurges, after all we have a big wedding coming up, my big brother is getting married! But I needed these rolls on my birthday week!

Ooey gooey caramel topping, crunchy pecans and rich chocolate pieces!  Yum! You gotta make these rolls, there's plenty to celebrate here!


CHOCOLATE CHIP CARAMEL PECAN ROLLS
One large 9x13 pan or 3 small round pans of rolls

Dough:
4 1/2 cups flour
1 cup  milk
5 Tbl butter
2 large eggs, room temperature
1/2 cup sugar
1 envelope rapid-rise yeast
1  tsp salt

Filling Ingredients:
1  cups packed light brown sugar
5 Tbl unsalted butter, room temp
2 Tbl cinnamon
1/2 cup chocolate chips, I used semi-sweet
1/2 cup chopped pecans

Caramel Topping:
1 1/2 cup brown sugar
12 Tbl butter
1/2 cup pecans, chopped
1/3 cup heavy cream
1/3 cup honey
1/3 cup water
1 tsp vanilla
1/2 tsp sea salt

Ok, let's get started! We'll begin with the Dough. In a medium saucepan over medium heat, warm the butter...just until it begins to get steamy. Don't let it boil! Remove from the heat and stir in the sugar and the butter. Let the butter melt and the milk cool down a bit...oh say...10 minutes. Now add the yeast. Mix in it well and let it hang out for a minute while you get your stand mixer. I hope you have one...it will make these rolls so much easier! If you don't...that's ok, you can do it by hand!
Ok, so in the large mixing bowl add 2 1/2 cups of the flour and salt. Now, add your milk mixture and whisk with the whisk attachment until is looks good and mixed. Add the eggs and mix well. Now switch out the whisk attachment and put in the dough hook. Add the remaining flour and let your mixer go to town for about 5 minutes. If you don't have the mixer, this is when your get to do it all by hand! Now cover the dough with a clean dish towel and place in a warm spot for at least an hour, so that it can rise.

In the meantime...let's make Caramel Topping! In a small saucepan over medium heat add the butter and the brown sugar. Stir until the butter is melted and the sugar in well incorporated. Remove from the heat and stir in the cream, honey, water, vanilla and sea salt.

Heat the oven to 325.  I like to use 3-8" round cake pans...and either freeze or give away the 2 extra pan of rolls. Lord knows we don't need 2 dozen cinnamon rolls in my house! Anyway, pour and/or divide the caramel topping unto the pan(s). Sprinkle with pecans.

When the dough has doubled in size place it on a clean and nicely floured working surface and roll it out in a large rectangle. I'm not great with measurements (I knew I should have gotten the yard stick out) but you want it about a 1/4" thick...so about 24" inches long and I dunno, about 8-10" wide. Spread on the butter, sprinkle with the brown sugar, sprinkle with the cinnamon, sprinkle on the chocolate chips and pecans. Then with the side furthest from you being to roll it up...fairly tight. Now cut slices a little thicker than 1"slices. I usually get 18 good sized rolls. Set them on the caramel goodness in the pans. Cover and set in a warm place once again but just for 20 minutes this time.

Bake for 30-35 minutes or until golden brown. Set a plate on top of the finished rolls and flip over letting the caramelly goodness drip down the sides.


Enjoy my friends!

Warmly,
Mary